10 Golden Rules of Mobile App Success

Golden Rule
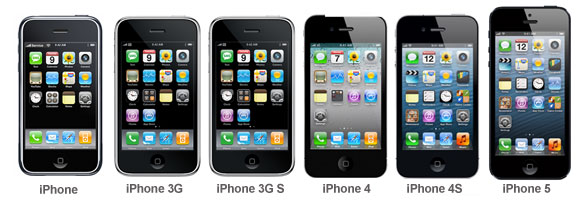
Fred Wilson, a famous Venture Capitalist from New York recently posted a video of a talk he gave a few years ago detailing his list of golden rules for web apps. These same principles also apply to mobile apps.

Essentially, this is a checklist of items that he looks for, when analyzing a potential investment. Whether you are looking for investment or not, it is still worth taking a look at these rules to see which ones your app follows and which changes it could benefit from.

1. Speed

In this day and age, the attention span of users is much lower than it was in previous generations. Users expect results instantly. Apps that take a long time to launch or pages that take a long time download affect the usability of your app in a big way. If there is a way for a process to be done offline, it should, in order to minimize slow internet disruptions. In addition, find ways to minimize the number of steps required to complete tasks in the app.

2. Instant Utility

Related to the previous point, users expect to be able to start interacting with an app as soon as possible. Apps that require a user to login or create an account, even before they are able to try it out risk losing users at an early stage. If your user is going to be rewarded for performing a task, make sure you provide the reward immediately and not make them wait.

3. Voice.

Try to create some personality in your app, to make it fun and engaging rather than dull and corporate.

4. Less is more.

Great apps are known for their simplicity. Start with doing one thing really well, and only add more features when you’re successful with that one thing.

Clean App Design

5. Programmable

Want to grow big really quickly. Let others build on top of your app. Let them add more value by submitting their own content. This will bring you more users, data and richness which will help you scale bigger much faster (make sure your backend can handle the growth though!).

6. Personal.

Let users add their own personality and energy to your app. This could be by letting them customize their own avatar, background, description etc. Let them make it feel like their own space.

7. Share

Make it easy for users to share as many aspects of your app as possible. This could include scores, progress or other updates that end up promoting your app usage with the users’ social networks.

Social Share Buttons

8. Discoverable

Is your app easily discoverable? What features have you implemented to help it grow viral on social networks. Are there search terms that potential users would use to discover your app on the app store?

9. Clean

Keep the user interface clean. Each page should have a clear goal and purpose. Try to keep a lot of open space and use large fonts where possible.

10. Playful

Make your app playful and fun to use. Incorporate game dynamics where appropriate, such as follower counts, badges etc. that encourage users to contribute and rank themselves among their friends.


App Updates – When Should You Do Them?

App Update History
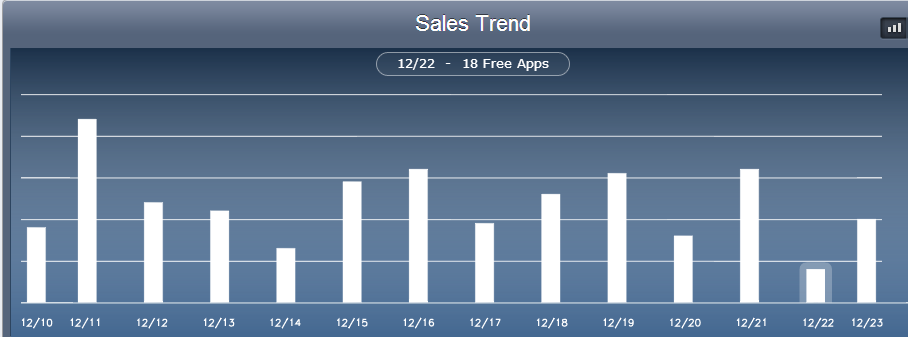
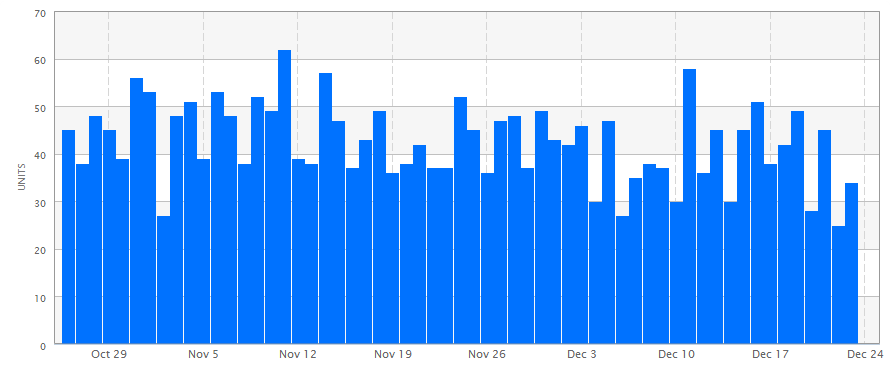
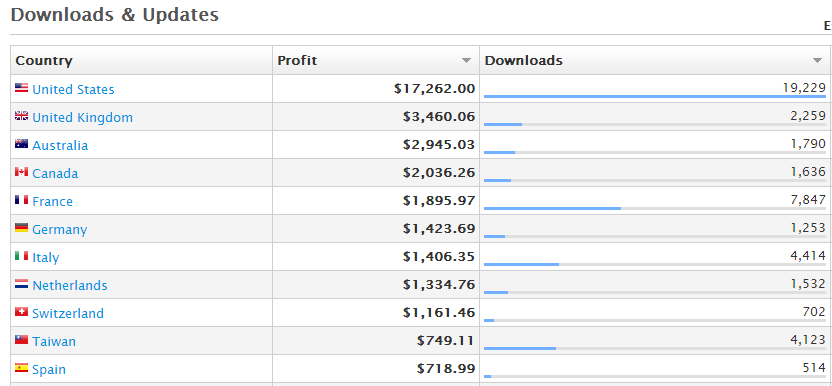
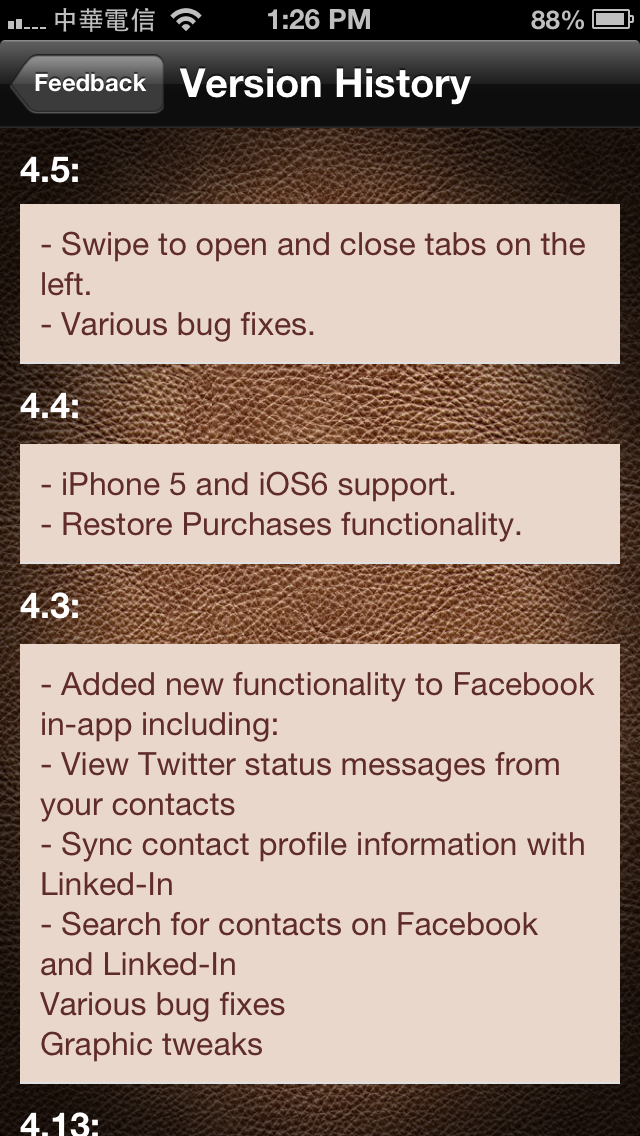
Getting your first app published on the app store is a big accomplishment. However for most apps, it is just the beginning. Depending on the type of app and its complexity, you may need to continue supporting the app with further updates. In what situations should you be releasing updates?

  1. Bug fixes. Obviously if your app is crashing and not doing what it’s supposed to do, then it is in your interest to get it fixed as soon as possible, to avoid low ratings and negative reviews
  2. Operating System Updates. Each year, Apple introduces operating system updates. Depending on the nature of your app, some of these updates could duplicate features already on your app, or add new features that your may be able to take advantage of. In some cases, system updates may result in your app not working the same way it did originally. So it’s in your interest to keep up to date with the latest system updates and make sure that your app works properly and takes advantage of all the features that the latest OS have.
  3. Competition. You should be constantly keeping an eye out on the competition to see what features their apps have, and which ones you can learn from. Perhaps they may introduce a popular feature that your app does not have. Or maybe a new app comes out that replicates your feature set for a much lower price. Either way, you need to be aware of what else is out there, so you can decide how or whether to react.
  4. 3rd Party Features. From time to time, 3rd party companies will come out with features that your app may benefit from, such as Facebook login support or a new ad network. If you see something compelling, you may decide to add support for it in your app.
  5. New Devices. Since the launch of the original iPhone, Apple has released several other iOS devices with different form factors and resolutions. It may be in your interest to target the latest iOS device features such as retina display, the iPad or the iPhone 5’s larger screen.
  6. New Features. If you created a lean version of your app to begin with, and are seeing success with your downloads, then you might decide to add additional features to your app, to keep it competitive (or charge more for it).
  7. In-app purchases. As updates are always offered for free, if you want to add new functionality to your app that you want to charge for, you can consider releasing it as an in-app purchase. This way you can keep the main price of your app low, while offering users additional functionality for an optional add-on price.
  8. Reinvesting in your App. Perhaps the first version of your app was done with a low budget to gauge interest. You could then reinvest sales from current downloads back into your app to improve it further. Perhaps you can now afford to hire a better designer.

Case Study – STL Contacts Manager

STL Contact Manager

This app has been my most ambitious app project to date. The goal was to take the functionality of several apps and combine them into one. So instead of having separate apps to manage your contacts and events, a single app could combine the functionality into one. I started with just the contact manager functionality, then slowly added additional features to it, that I’ve been selling as optional add-ons.

Since the first version, I’ve had to release updates to support the retina display and more recently, Apple’s iPhone 5 screen. The app also interacts with Facebook and Twitter APIs to integrate that functionality into it.

Feature Creep

There is a term in the industry called feature creep that you should watch out for. As users give you feedback on your app and suggest new features for you to add, make sure you keep in mind the original vision of your app, and don’t stray away from it. Otherwise, two issues may occur:

  1. Adding too many features may make your app harder to use, with too many options for your users to choose from.
  2. If your app tries to do too many things at once, it may affect your app’s branding. What is it that your app does and is known for?

If you find yourself straying too far away from your app’s original purpose, then you can consider spinning off a new app instead.

iPhone App Reviews and Feedback

iPhone App Review

So now that you have an app ready and published, what comes next? Sit back and watch the money roll in?

Not quite.

Ideally, to save time and money, you’ll want to first publish the simplest version of your app idea. Get it out there quickly so you can get feedback from your users. Do they like the product? Are there additional features they would like, that they would be willing to pay more for?

So how do you get this feedback? There are multiple ways.

  1. User Ratings and Reviews. Take a look at the app store to see what kinds of ratings and reviews your app is getting. 3rd party products are available to make this process easier. If your app is getting consistent 5 star ratings and wonderful reviews, then maybe you’re done, and can look at marketing your app further, or other platforms to expand onto. If your app is getting lower ratings, then you still have work to do. Analyze what kinds of problems and suggestions your users are giving, and decide whether it’s worth releasing an update to solve them.
  2. Run Promotions. If you’re not getting enough ratings or reviews to determine if you’re on the right track, you can try lowering the price or even make it free, to increase the number of downloads you get. More downloads should lead to more ratings and reviews.
  3. Bug Reports. If you use a 3rd party service to report bugs, then take a look and see if your app is crashing on user devices. Try and fix these bugs and issue a new update as soon as you can, to avoid low ratings.
  4. User Emails. Add a contact us button to your app, to make it easy for users to send feedback to you. If a user takes the time to send you an email (even if it’s a negative one), that means they care enough about your app to take the time to provide you with this feedback. Not getting any feedback from your users may be a sign that your app isn’t good enough to warrant such effort.

Turn Problems into Solutions

If you do have issues with your app that users are emailing you about, make sure you follow up with them to get the problems fixed. Once an update has been released to address the issue, email them to let them know. Find out if the new update indeed solves the issue or not. Also use this opportunity to ask about any other suggestions they may have to improve your app. Some of the biggest fans of my products have come from users who initially emailed me with problems.

Generating Positive Reviews

Leave a Review App Popup

One problem with feedback is that most of it tends to be negative. Users are more likely to leave a negative comment or review for features that don’t work as advertised, than to leave a positive comment or review for your app doing what it promised to do. So how do you overcome this?

One solution that many apps do, is to generate an automatic popup after a user has used the app a minimum number of times (eg. on their 10th time). The popup asks the user what they think of the app, and encourages them to leave a review.

Why does this popup show on the 10th time, and not on the 1st time?

The idea here is that if a user is using your app for the 10th time, that suggests that they like and enjoy using your app. So the review or rating they give at that point is more likely to be favorable. If they didn’t like your app, then they would have quit using it a long time ago.

iPhone App Downloads Reports

Once you have completed your app and posted it to the App Store, nothing beats the feeling of waiting for your first sales report. How many downloads did you get on day one?

Later, you may release updates that add additional functionality to your app. What effect does that have on your app downloads?

What if you changed your icon, or used a new feature screenshot – would that make any difference?

Apple themselves provide you with 7 days of daily sales reports and charts for your apps. These reports can be exported if you want to keep track of longer term trends.

iPhone App Sales Report

A different service that I highly recommend is appfigures. In addition to providing you daily email reports of your sales (meaning you don’t have to manually check yourself), they automatically archive your long term reports, so you can track longer term trends.

iPhone App Sales Chart

Want more data? Do you know which countries make up your top markets? If not, there is a report for that.

iPhone Country App Sales

Why is this important? You can take a look at which non English countries make up your top markets, then add additional language localization to serve those markets.

The interface gives you a great overview of how your apps are doing, including reviews and rankings. A lot of this data is available directly from the app store, but the interface here makes it easier to directly receive this information for your app, instead of having to manually search for it.

If you’re not using appfigures now, it’s worth checking it out!

iPhone App Crashes: Detecting and Fixing Bugs

iPhone App Error Message

It happens.

You spend your heart and soul building the perfect iPhone app.

You put it out there.

You wait for the glowing reviews to come in.

But instead, you get 1 star reviews complaining about your iPhone app crashing.

What can you do?


Detecting Bugs and Crashes

  1. Reach out to the User. This is tough to do if bugs are only reported in reviews. Ideally there should be a feedback or contact us option within the app so users can reach out to you with suggestions, feedback or a place to report bugs. See if you can find out the exact steps required to duplicate the bug or crash on your own device. Then report this to your developer.
  2. Automatically generate crash reports. New services like bugsense can be installed that create crash reports each time your app crashes on a user device. Details of the crash are then emailed to you, or can be accessed from your bugsense account.

Fixing Bugs and Crashes

Once your developer has the details of the crash, he can hopefully figure out what is causing the issue, and find a solution for it. He can then send you an ad-hoc build for you to test, to see if the issue has been resolved. If it has, then submit an update to Apple and monitor your crash reports to see if the issue is still occurring.

In some cases, you may find an issue that only occurs on your device, and not on your developer’s side. Or there may be certain types of errors that don’t generate crash reports.

If your developer is in-house, then this isn’t a problem, but if you’re outsourcing your app development work, then there needs to be a way for your developer to run tests on your device (from overseas). Fortunately, this is possible as well. The process would look something like this:

What you need:

  1. A Mac desktop or laptop
  2. The latest iOS Xcode development software (downloadable from Apple’s iOS developer site).
  3. Teamviewer remote desktop management software
  4. Skype, Google Talk or similar communication software
  5. Your iOS device (iPhone / iPad) plugged in to your Mac

Process:

Team ViewerYour developer can login to your Mac remotely using the Teamviewer software.

From there, he can install the latest version of your app code into the Xcode development environment.

He can then launch your app onto your device in debug mode.

You would then try to cause your app to crash.

As you are doing so, your developer can check what your app is doing at each step, and hopefully find out exactly what is causing your app to crash. Depending on how complicated the solution is, he can make changes to the code on the spot, and relaunch the app on your device to see if the issue is then fixed.

How to Test an iPhone App

Once you have a developer building an iPhone app for you, it is important to test all aspects of it. How does this process work?

Have the Right Device

All iPhone Models

Ideally, you want to have your own devices available that you can test on. You could depend on beta testers or iPhone simulators, but this is not the same as testing your own app on your own device. One of the benefits of developing for iPhones, is that testing is much simpler than it is on Android. All you need to get started is the latest model of the iPhone (since each new model tends to eclipse previous models in sales) – which is what the majority of users will (soon) have.

Things are a little trickier these days with the iPhone 5, since it has a different form factor that previous iPhones. This means that, to avoid complications, you would want to test on an iPhone 5, and an older iPhone just to see what your app would look like on both devices.

Another benefit of developing for iOS devices is that most iOS users tend to update their phones fairly quickly, when a new operating system is released, so it’s not as important to test your app on older versions of the operating system as it is on other mobile platforms. When a new version of the operating system is announced, Apple usually gives developers a few months notice to test their apps on the new operating system, before it’s released to the general public, so that there are no surprises in store for you.

Bottom line: If you’re a small developer (as most people are), then focus on the biggest market – pick the current model iPhone and the latest operating system and make sure you’re testing for that.

Getting the Test Version onto your iPhone

Finding UDID

So how do you test a mobile app on your device? The first thing you need to do is find your device ID (also called UDID – Unique Device Identifier). This number will need to be emailed to your developer. He will then create a special beta test version for you using this UDID. Because the UDID will be a part of the file, other devices will not be able to run this version of the app, unless their UDIDs are also provided (Apple lets you submit UDIDs for up to 100 devices).

There are two ways to find your UDID – one (3rd party app) easier than the other (iTunes).

  1. Via iTunes: Plug your phone into your computer, launch iTunes, find your UDID and copy and paste it in an email to your developer.
  2. Via 3rd party app: From your iPhone, visit the app store and search for UDID – you should see several apps in the results. Pick a free one. It will then let you email your developer directly from the app, with your UDID pasted in.

Once your developer has your device ID, he can then email you a test version. How do you install it to your phone from the emailed file? Again, there are two ways – and again a 3rd party company has come along to provide a non iTunes way (easier) way:

  1. Download the IPA file that your developer sends you and drag it into the left sidebar of iTunes. It will then be installed, the next time you sync your phone with iTunes.
  2. Use a 3rd party service like testflightapp. Your developer will then upload the file to their site. Their site will then email you instructions on how to install the version directly onto your phone. The beauty of this approach is that you can install the file directly from your iPhone email without having to sync your device with your computer. This approach is highly recommended!

Testing Your App

Nothing beats the feeling of testing a live version of your app on your own device. There is something exhilarating about seeing your concept go from conception to mockups to actually running on your phone! So what are you looking for at this stage?

  1. Does the app provide all the functionality that was promised in this version?
  2. Can the usability be improved? For example, are there ways to reduce the number of steps to perform a function. Is it easy for users to figure out how to perform a task?
  3. Are there any bugs (crashing, freezing or unexpected behaviors) in this version?
  4. Does your app handle all the use cases? What happens if a user enters an unexpected value into a field? Does your app display the right error message?

Depending on the complexity of your app, you may also want to get other users involved to test out your app. This is important since while you understand your app well and how to use it, others may not understand the concept as well as you do. When getting others involved, ask the following questions:

  1. Do they understand the concept of the app and what its purpose is?
  2. Provide them with some test tasks to accomplish in the app, and see if they are able to do so.

For smaller apps, you and invite friends to help you beta test, by emailing them with copies of your app (using the same methods listed above).

For more rigorous testing, you can sign up for a 3rd party service that match developers with testers, such as thebetafamily or centercode.

So while your developer is working on more advanced features, you should be testing the current feature set to make sure everything’s working the way it should be. The earlier a bug is found or change is made, the more time and money it will save you down the road, so be diligent in this area.

If there are any other tips you’ve used during the testing phase, or any other 3rd party resources you can recommend, do let me know in the comments below.